Sunday, February 1, 2015

To Sum It All Up

This post is a quick summary about all the animations we have created in class this semester.


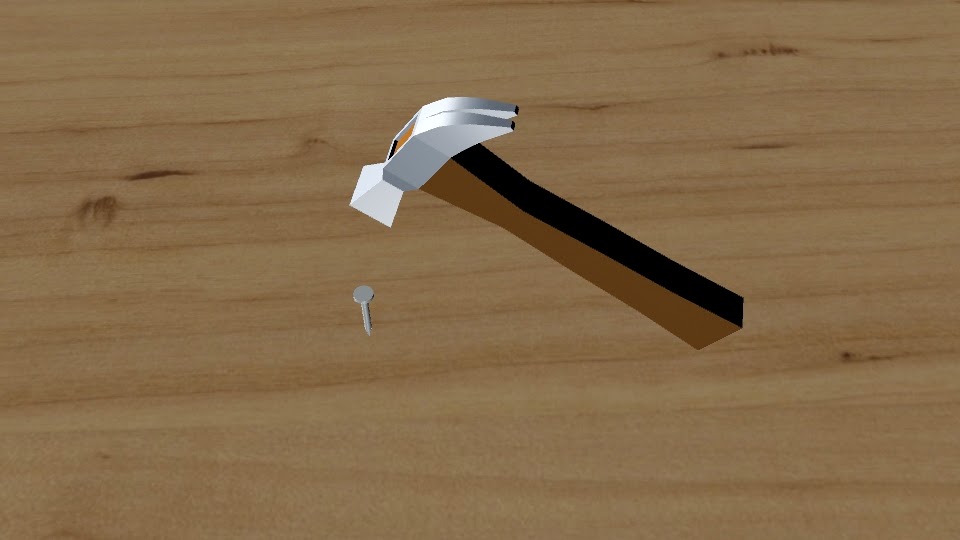
This is a hammer and nail I created in eComm. In this project I learned how to extrude faces and split polygons. Extruding faces allows me to make a certain side of the polygon extend and get bigger/smaller. When splitting polygons, I use the Cut Faces Tool. The tool allows me to draw lines onto the polygon and turn one face into two. These tools came in handy when creating the claw peen and the hammer head on my animation.

In eComm we built an Ice-cream shop. This included animating ice-cream, table, a bowl, a    scooper, a cone, and an ice-cream stand. To make these items we Extrude Tool and had to combined many polygons. For the ice-cream we used the Bump Maps to give it a texture similar to real ice-cream. I also decided to put all items on the table onto a Lazy Susan. I used keyframes to animate the items spinning on the Lazy Susan and put it on a Loop.
This next project was a bit tricky. I animated three different balls bouncing. The project was to show the difference between each ball that bounces. I had to use many keyframes and time each balls bounce. The Graph Editor helped me in this process. It shows a grid of each balls bounce and lets you change the way the ball bounce to make it look more real.
I loved this next project! In class, I animated a glass cup and a jar. I couldn't accomplish this animation without NURBS (Non-Uniform Rational B-Splines). This helped me create smooth curves for my jar and cup. Using the Curve Tool, I outlined a cup on the graph creating curves. After I doing that step I used the Revolve Surface Tool which duplicates my curves that I outlined, creating a cup. For my jar, I used the same process and decided to make it look like the Honey Pot from Winnie the Pooh. I am very happy with the way they both turned out.

I made an animation of the salt and pepper shakers from Blues Clues. I used the Shelf Icon to create the first circle curve. I then selected symmetrical vertices and scaled them down to get the base shape of the salt shaker. After that, I duplicated it and started them on top of each other till I though it was a good height. I created another circle and put it on top. Once I created the shakers shape I put a loft surface over it. This creates the curves making the salt shaker 3 Dimensional. I then created a top for my shaker. I drew out a sphere and put it on wireframe view. I changed the vertices to make the top of the sphere more flat. After that, I deleted the bottom half of the sphere using Boolean Difference. I next worked on punching in the holes on the top of the lid. I created a cylinder and copied it using Duplicate Special. This makes the cylinder appear on the lid eight times in a circle at forty-five degrees. I then did Boolean Difference again creating the holes for the salt to fall through. This concludes the process of making the shape of the salt shaker.
This animation is called the Polything. To make the Polything light up we used three point lighting. Three point light is when you use three lights and point them at the subject from three different sides: the front, the side, and the back. In the project we mostly used the Directional Spot Tool. Other lights include: ambient light, point light, spot light, area light, and volume light. These lights help us show the object more realistically. 

Sunday, December 14, 2014

These Are Not the Donors You Are Looking For


In Video class we were assigned to make unscripted videos where we will film and interview one person about what they are doing. The goal is to create a story. In our first project we were assigned partners and had to film them building a Star Wars Lego Spaceship. We were also assigned to film the ONW Blood Drive.

My Process-                                                               Lego Project:
These kinds of project does not require you to storyboard. It is unscripted with live action. While filming, I tried to get all six shots. This project was difficult because I didn't know what was going to happen and how the footage would turn out.

What did I learn?-
These assignments taught me a lot about unscripted filming. When filming, you couldn't have a tripod. I learned how to hold a camera steady and keep me balance. I learned how to stand close to the person your filming. This allows you to hear the subject when he/she is talking and to get good close-ups. In the editing stage we learned how to do J and L edits. J and L edits are when you take a clips of video or audio and overlap them making a J or an L. Nat noise is also required in this project. It makes the video seem more real and helps the audio flow together. All this helped me create my lego project below.

What would I do differently?-
The Lego project was harder than I would have expected. Looking back on my footage I realized, I didn't hold the camera steady enough. This made is hard to find good shots of of my subjects I was filming. If i got the chance to redo these assignments I would have gotten more of a variety of shots. In my Blood Drive video, I didn't get the chance to film my subject donating any blood. This made it hard for me to create an ending in my store. My solution was to make the very last shot of my video turn into  a horror film. I also would have asked more questions. In my Lego project I didn't ask enough questions while filming. This caused my video to have a lot of voice overs in it. I believe fixing these problems will make my videos more professional and interesting to watch.

What would I do the same?-                                      Blood Drive:
Out of my two projects, I would keep the interviews I did in the Blood Drive project. My group had to share a camera. Unfortunately, we didn't get to finish filming but, we decided to take all of what we filmed and combined it. This made my Blood Drive video more interesting because it showed the thoughts and opinions of multiple people at the blood drive.

What experiences will you draw from to enhance your next project?-
These assignments have taught me many things about unscripted filming. I will remember to ask more questions to my subjects. I will also remember to manage my time and make sure I get enough footage.  I will learn from the mistakes to make my next video even better! This will make my future videos look a lot more professional.

Saturday, November 22, 2014

A Hike For Food

The class was assigned to make a 2-D animation with three different shots. In order to create this animation, we had to combine everything we learned from the past assignments. When brainstorming for story, it is important to think of an idea that is not too complex as it would take too long to make. I started doodling characters on a piece of paper and tried to get inspired. I personally liked my drawing of a bunny. It was simple and I thought I could create a good story inspired by that drawing. I decided to make my bunny try to pull a carrot out of the ground. When he does, things get more complicated.The carrot will fly onto the mountain behind him forcing himself to climb the mountain to get the carrot. Once I planned that out onto my storyboard, I was ready to start the project. First, you had to scan your drawing of your character onto the computer. Then you must color it on Photoshop. Also you have to create the background settings on Photoshop. After this, you get to drag the layers of your character into Adobe After Effects. This program allows to move your character and make the story you want. You use key points to help position or rotate your characters. I learned how to make pre-compositions. They help you stay organized with all your layers. I had to make sure that all the compositions were put in the right place so that each clip would move nice and smooth. I also learned something about myself. I am a perfectionist. Usually that's a good quality to have but in this case, it kept me from completing my project on time. Project deadlines are very important. You can't become a professional animator without completing your work on the day it is due.
If I could redo this assignment, I would look back at my leg compositions and change it so that you can't see the top of the back leg when it goes up. I would also make sure all my layers of my character in Photoshop have a completely deleted background, While editing my animation, I noticed that some of my layers still have little spots from the white background. I think doing this will make my animation look better and more professional.
I would keep my story the same. I like how it is creative and simple. I would also keep my character the same. My bunny is a simple character and goes with my story very well. I like my close-ups of bunny's arms pulling the character. I think it is a cool shot and helps the viewer focus on what the bunny really wants.
 This experience has made me a better animator by pointing out what I need to work on for our next project. I am one step closer to becoming a true animator and reaching my goal.
I will take what I learned from this assignment and use it for our next project. I loved this activity and can't wait to do the next one!

Tuesday, November 4, 2014

Break Free


Our assignment was to create a music video. The video would have to tell a story and last at least ninety seconds. It also had to go along with the music and made sure the shots went with the beat. We had to think of these things before we started story-boarding.

Our group decided to use Ariana Grande's song Break Free. We used beat sheets to brainstorm idea's of what we wanted our song to be about. We watched music videos related to Break Free and pulled out ideas. We thought it should be about bullying and how the person getting picked on finally fights
back and break's free. We also created mood sheets, a collage of pictures that was supposed to show the mood of your video. This process gave us a general idea of what we wanted our video to be about and we were ready to storyboard. While story-boarding you have to think of the six shots and the 180 degree rule. Our group formed a group message on our phones and organized what we would film each day. This process made things a lot more easier and I felt my group was ready to film.

I learned many important things throughout the process of filming. On the days our group was filming, we had strange rainy weather. This was a problem for our lighting. The shots became yellow and dark. I learned that it is important to shoot your scenes in an environment that has good lighting. I also learned that it is important to not have any continuity errors otherwise, the viewers will become confused and not know what is going on. In our editing stage I learned how to show multiple shots at once. This gave my video a dramatic effect.
I felt that my group worked well together. We communicated outside of school to help us stay on task. We worked very hard on this video while also having a lot of fun!

If I had the chance to redo my video I would definitely film more shots. In the stage of story-boarding we edited to the lyrics instead of the beat and that messed me up later while editing. I would also redo the first super hero shot and find a way to make it look more dramatic. While planning this video we originally wanted a silhouette shot of us superheros but; it came out too dark and ruined the scene. I would redo any shots that were darkened from the weather to make the lighting better.
I would keep our story in the video the same. I believe it went well with the song. I also would keep i the flashback shots in the video because it added to the effect. I was very cool the way each shot changed with the beat. I would keep the shot of Jessica running toward Eric, the villain about to punch him in the face and the shot right after that  where it shows her hand punching Eric in the face. The two shots were the view points from the villain's eyes to the superhero's eyes. I believe these shots were the best out of all and I would certainly keep them.

This assignment was very informational. I learned about digital effects when editing such as; showing multiple shots on a screen a once and adding a slow motion effect. I learned how to give a shot the ghost effect and make it look see-through. I also learned how to add markers to the beat of the music. This helps me when transitioning from one shot to another. I will use my new skills for our class's next project.

It was very fun to film this project. I learned about teamwork. I also learned some new effects I can use on Final Cut Pro. The whole experience has taught me a lot and I can't wait to use what I learned on our next project!

Tuesday, October 7, 2014

Toto, I Think We're Still in Kansas

The Multi Layer project taught me a lot about time management. I was using my class time working on the details of the background. This was confusing to me because I made too many layers.  I learned how to make each background layer's speed different. I also learned that when making a character move in your setting, it is important to make sure your layers of the background are moving. Otherwise, it becomes a continuity error. This project was a lot of fun. I believe the information gathered from this experience will help in our next class project.

Monday, October 6, 2014

Henry The Alligator


My character is an alligator named Henry. I decided that he should look "cartoony", so I drew him with sharp edges. I wanted him to be different from other normal alligators, so I drew a stylish poke-dot bow tie for him. He doesn't act like all the other alligators. Henry likes to look on the bright side of things, he always has a big grin on his face. Henry loves to dance and dreams of becoming a famous dancer.

During this project, I had difficulty in making the feet move. My original drawing had the feet pointed outwards. I realized having the feet like that would cause my character to walk like a penguin. I had to go back into Photoshop and flip the second foot horizontally. Once I did that, I went back into Adobe Aftereffects to start creating the key-frames which made my character move.


The Key-frames record what ever you do to the character. The first step is to place your character where you want it to start. Then press the icon that looks like a stop watch labeled Position. This will make a key-frame appear letting you know that this step has been recorded. The next step is to drag the bar to the timeline where you want to have the character move. After that, you move your character to the place you want it to be. This is recorded making a key-frame appear where you dragged your bar out. When making feet move, you have to make key-frames that make the foot go up, out, and back to the original place. The great thing about key-frames is once you put the whole rotation of the foot stepping, you can copy and paste the key-frames.


I learned that visualizing your character walking, before you draw him, can help you catch mistakes like the toes being pointed outward. I learned that you must make key-frames carefully, One mistake can ruin the whole animation. I also learned about keeping your pace during these projects. I was falling behind the class because I was focusing on coloring the character in and giving him detail. If I could redo this assignment, I would make Henry the Alligator dance across the screen. That was my original plan, but I didn't have time to do it in the end. Overall, I am really happy with my character and I hope you are too!