Monday, December 19, 2016

Animated Short Film Review: The Present

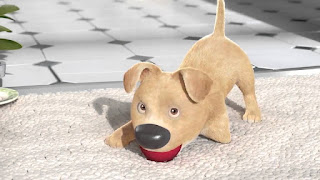
The Present tells the story of a teenage boy and his growing relationship with his dog. The opening scene shows the young boy playing a video game. The viewer can tell that the kid is addicted to playing by the way he responds to the light when his mother opens the blinds. The mother sets a plain box in front of him saying it is for him. The boy opens this present and out pops a puppy. Excited, the boy lifts up the small dog. The boy notices that the puppy only has three legs and suddenly looses interest. He rejects the dog and ignores its playful joy. During this scene, the puppy is playing with a ball while trying to make the boy play fetch with him. Finally, the boy is intrigued by the dog and decides to take him outside. To the viewer's surprise, the boy is on crutches with a missing leg.

To the naked eye, it would appear that the present is a dog. However, the real present for this boy is the motivation to have a life. Before the present, the boy would play video games. He didn't want to be on his feet because it reminded him of his crutches. He couldn't find joy in life until the puppy showed him it didn't matter if he had crutches. He has the capability to do more in life.

This animated short was put together very well. It has a clean look with simple textures that go along with its cartoon style. The characters were very well modeled an rigged. I especially love the dog and his energy when playing with the bouncy ball. The story was simple and surprised the viewers in the end. It is not until the end that the viewers realize the purpose of the boy's actions.

I wish to make heart warming films just like this. I love films that make you think and feel for the characters. I believe films should always have a good message behind their story. Sometimes the message is not as obvious as others, however, that just encourages the viewers to seek the message.

Although this was a very well animated story, there were some flaws. I believe that the fact that the story is unclear til the very end could be seen as confusing to the viewers. Another critic I would make is the details of the setting around them. Although it was animated very well creating insight to the boy's background information, the objects were seen as distracting to me.

This is a successfully made short film that has grown very well known in the film business. I hope to make a story like this as well that captures the hearts of others.

Coloring Tutorial

The color scheme an artist uses applies to the tone they won't to set in the image or scene. Dark grays and browns imply mystery and fear. Bright pastel colors represent warmth and happiness. Faded colors represent age, abandonment, and isolation.
Colors are important because they play a key part in displaying the story and nature behind the artwork. 
The first step of understanding color is to understand shading: the darkening of an illustration. 
Darkening pieces of an illustration helps show the shadows of the curves and corners of the image. It shows depth. To understand where to shade dark, one must first identify from which angle the light source is coming from. The parts of the picture blocked from this light source will be the darkest.

This also works for colors as well. You can shade an image with a specific color by using the brightest and darling forms of those colors. 

In scenes with multiple colors, you must develop a color scheme. The colors you use must coordinate in a specific way that goes along with the tone of your image. 

These are some examples of color schemes I have used to create moods. 

This is an image of a tall building. By using dark blues and grays to create the view of a dark and stormy night. 
At the top of this image shows the color scheme I used for this landscape. The calm and warm colors are supposed to show a peaceful, sunny day.

Thursday, October 13, 2016

Day Dream


 I just finished my 2D stop motion semester project called Day Dream. I combined my artistic skills and my animation skills into one animation that I plan to use for my portfolio. I wanted to challenge myself by having my animation be more detailed and realistic.
This animation is more focusses on technique than story plot. To put it in simple terms, this animation is about a girl looking for inspiration for her drawing. She begins to day dream. Her rapid change in thought is shown through each subject transforming into something different. In the end, the girl is struck with an idea and begins to draw on her paper.  

I drew each frame of my animation on paper and scanned it into the computer. Then, I dragged those images into Adobe Photoshop CC and lined them up next to each other. I decided to color over the frames with low opacity to give a sketchy effect to my animation. To add to the idea of dreaming, I am only colored the frames that the girl is dreaming of. I kept the scenes outside of the dream black and white.

This is a picture of a portion of the frames
I drew for this animation. 
It took me all semester to put this project together and it still is not fully completed. I definitely feel that this project has challenged me and has allowed me to grow as an animator. I have learned the importance of the number of frames I used per second. During the process of making this film, I struggled with timing out each section. My animation moves at a fast pace making the experience of watching my film a little confusing. There is not enough time between transitions for the viewers to process what is happening on screen. I will be going back into this animation to add music and more frames to make the 2D transitions more pleasing to the eye. 

This animation is twenty seconds long and is made up of more than a hundred frames. This project was time consuming and took a lot of patience, however, I am satisfied with my ability to draw frame by frame. I love the informal outlines of each frame. It makes the animation look as if it is being told on a piece of paper. Over all, I am proud of the work I have done for this project. I can not wait to see the improvements I make as I apply what I've learned in this project to my next idea.

I hope you enjoy my quick animated film, Day Dream. 


Wednesday, May 18, 2016

My Reflection of the Year

I can't believe it has been a year already! I guess time flies when you're having fun(:

I have learned so much this year- mostly in 2D animation. This year I have been working in After Effects and Photoshop creating 2D styled short films. Lately, I have been working in Photoshop and practicing how to draw each shot frame by frame. Although it takes forever, I really enjoy that style of that type of animation. I find it beautiful and believe every frame is a piece of artwork.

I have learned about time management- you kind of have to know how to do that since animating is a very time consuming thing. I have noticed that it is important to stay focused and to be on task. By following this step, I am able to get my work done faster. However, in animation, it can get challenging working on one project for so long. A tip I use is when I get bored is I transfer to a different project I'm working on and switch back and forth every now and then. This helps me keep high energy and excitement for my animations.

I have learned about story making and how to express emotion into your animation. I have learned that animations do not have to be fancy with detailed drawings in order for it to tell a story. In my animation Crooked, I used stick figures because I wanted the audience to focus more on the story itself instead of the characters in it. To make the audience feel what the character feels you have to make them connect to the character. You must put emotion into the character in order for the viewers to show emotion for that character. In my short film, I made my main character- Skully -have a feature that makes him stand out from the others. Everyone at some point in their lives have felt different from others. This allows the viewers to connect with Skully. My story is about embracing your differences and believing you are special in your own way. I believe I was successful at creating a simple but heartwarming animation.

I have learned how to work with others as a team. For example, in my group and I's animation Montage, we had to compromise on what type of animation it would be, what the story was, who would be doing what job, and so much more. By keeping open minds and positive attitudes, my team was able to band together to finish that animation.


I have learned about how to draw from perspective. For example, I animated a ballerina dancer spinning. While she is spinning, the viewpoint of her is kept stationary so I had to draw each frame from that perspective. It was challenging. As her leg came closer to the "camera", I had to draw it as if it was getting bigger and rounder. It looked unnatural at the time but when I pressed play, her spin looked more natural and graceful.

One thing I would change about this year is to make time to learn more about 3D animation. This style of animation is essential to leaner if I want to pursue my dream of becoming an animator.

I am going to take what I have learned from this year and apply it to my summer. I  plan to take four hours out of my day to draw and or animate. This will help me develop my portfolio for college.

I am excited to come back to eComm next year and see what senior year has for me!

Sunset

For this assignment, we had to show time passing through an animation. Examples such as: A character aging, an object rusting or decaying, or seasons changing. 

I decided to animated a 2-Dimentional sun setting. I originally came up with this idea when in the process of developing a story for a different animation I'm working on- The Artist, coming soon. 
I made this animation using the two programs Photoshop and After Effects. I first drew the landscape of my sun set. I made every level of the land a new layer. I wanted to make my animation with a variety of colors and nature. The image shows purple mountains, glistening waters, pink flowers, and a mixture of orange, pink, and purple clouds. 
One feature that was important to me was the sky. I personally love the sky and wanted to show its beauty through this animation. When I look up at the sky, I see a painting full of rich warm colors that blend with one-another. One minute the sky is orange and purple; the next it's cotton candy colors. I wanted to capture these transformations in my animation. As the sun sets, the sky color changes colors in the background. When working in Affect Effects, I had to manipulate the opacity of each sky layer to blend them together and create a beautiful transformation from day to night. 
To make the scene look as if time of passing, I had to animate the clouds to move across the sky. If you watched the sky closely, you would find that the clouds move across in slow motion. Another trick I used to show time in my video is ridging the sun's rays to fade away as it continues to set. As soon as the sun is hidden behind the mountains, the stars come out and the picture slowly fades to black.  
I had a lot of fun creating this animation and bringing this drawing to life. Hopefully you will see it again in my new animation The Artist that I am currently working on. 
Just a heads up! This animation is supposed to look as if it was a recording of a sunset sped up. It is only 10 seconds long. 


Friday, March 11, 2016

Ball Bounce Tutorial


Today I am going to share how to use 2-dimencinal animation to make a ball bounce. This is to help anyone who is interested in 2D drawing to learn the basics of drawing frame by frame. In this lesson you will learn how to use a motion scale, Photoshop, and how to render the video. 

Lets begin(:


The Step by Step Process: 

  • Materials needed: At least 15 pieces of paper, a pencil, computer/Photoshop
  • Take out a piece of paper and draw a straight line out the side that goes across most of the paper. This is going to be your motion scale. A motion scale is a helpful tool you use when planning out the motion/speed you subject is doing to the scene 
  • On your motion scale, begin to make line marks that tell you where you want the ball to be during each frame. In my ball bounce example, I used 15 sheets of paper meaning there are fifteen frames. In the image out to the side, it shows what my motion scale looks like. Each line represents a frame.
  • When drawing out your lines on the motion scale think about the motion of your ball and what you want it to do. It the ball being dropped from a height? Is it bouncing off the wall? Or is it bouncing across the screen? These questions will help to plan outlaw the ball will move in your animation. In my example, I made my ball look as if it were dropped and made it bounce up and down. My motion scale shows that the ball slows down when reaching the top (that is why the lines are close together) and then speed up when approaching the ground (that's why the lines are spaced out at the bottom). 
  • You want to make the ball look realistic like an actual ball that bounces. When the ball bounces up, it slowly comes to a stop when it reaches its maximum height. When the ball starts to fall back down it moves faster the closer it gets to the ground. This is because when the ball bounces up, it is working against gravity which makes it move slower and slower the more it goes up. When the ball moves down, gravity is working with the ball and helping it move. This increases the speed of the ball when traveling downward. Who knew Physics applied to animation!?!?
  • Once your done with the scale, start drawing the ball next to the scale's line. Each ball frame must be drawn on a separate sheet of paper so when you pull the pictures into Photoshop and line them next to each other; it will look like the ball is moving and not just one still image. 
  • When you are done with the 15 or more pictures of the ball, you can then scan it onto your computer. 
  • Once it is on the computer, open up Photoshop and drag the images of the ball onto the program. 
  • Then, click the button "Create Video Timeline". This will allow you to start animating the ball bouncing. Once clicked it will open up a timeline at the bottom of the screen showing all the layers you dragged onto it. 
  • Short each layer of you drawings to one frame each
  • Then, drag the layers/drawings into one of the columns in order. This should look something like the purple image below. 
  • After this, press the play button to the side and watch your drawing com to life. 
  • Fix any errors you see in the animation. 
  • Once you think the animation is finished, then go to File-Export-Render Video. Make sure it exports as a mp4. 
  • The final step is to sit back and enjoy watching your 2D animation! 


This is what your ball bounce should somewhat look like in the end. 

Wednesday, March 9, 2016

Montage

Project Overview:

This next animation was a group project in my class. We were assigned to create a stop motion animation meaning we had to take still shots of our subject-each with a slight change in position- and put them together. This gave the allusion that the subject was moving and doing its own actions.

My group and I wanted to have our animation tell a story. After brainstorming numerous ideas we decided to make a stop motion animation about a dragon who goes on a montage and travels through the computer.

StoryBoard:

 The next step was to assign roles to everyone in my group. I was incharge of creating the storyboard and plotting each kind of shot to take when animating and or filming.

Our story was inspired by a dragon named Drougue that-our head animator- Hanna Brady formed out of clay. We felt it would be interesting to have him be our subject and watch him make to life.

Our story starts off with Drougue stepping up to the computer's keyboard and searching for montage music on google. All of a sudden music begins to play and Drougue decided to explore the computer by walking into it. He transforms into a 2D character as he makes his transition into the computer screen. While inside, Drougue stumbles upon old animation folders and opens them up. As he travels from computer to computer, Drogue invites the other animations to join him on his "montage". Eventually everyone follows him out of the computer making them all change into clay figures. The very last scene is all of the animations deciding to watch an animated movie ending the montage.

This is the Montage storyboard.
It was my job to sketch out each scene describing how the shots were going to be animated.

When storyboarding I tend to add notes next to each shot to help organize the story and how we are filming it.

After storyboarding our animation, the next step was to scan each image onto the computer. I had to create a slide show in After Effects containing each shot from the storyboard. The purpose of this was to plan out how long each shot was going to be when filmed or animated.


In order to create the slide show, I had to crop out each shot in Photoshop and then drag it into After Effects. While in After Effects, I had to place the shots in the order we wanted to film it. I also had to trim the shots down to however many seconds it was going to take to animate it. This was to help calculate the number of pictures needed for the shot. For example, if we planned for one stop motion shot to be three seconds long then we would need thirty-six pictures of the character moving. In the end, After Effects informed us our animation will be around two minutes long.


Characters:


These are the main characters of my group's stop motion animation.

This is Drougue. He was the main character to our story. 

This is the Blue Dragon and the Melon Girl. They are the first two characters Drougue meets on his adventure.
This is Chucho. He is a green dragon and joins the journey with Drougue in the film. 


This is SAM. He is a unique character that follows Drougue and his new friends near the end of the film.

The Process:

It took a lot of time and effort to bing this story together. My team and I had to shoot the stop motion scenes outside of class using a camera and tripod. We had to take a picture each time we slightly moved our character. This would give the illusion that the character was moving.
Drawn By: Jessica Love


We had a three types of animation appear in the film: Stop-motion, 2D, and 3D. It was challenging to accomplish all three types of animations and still complete the project on time. Our Head Animator, Hanna Brady, took on most of the responsibility of creating the 2D animation. She drew the motion of every character per frame on the computer. Side Animators helped draw a few individual shots as well.

Every animation starts with a drawing. You must draw out each frame in order to have a smooth animation in the end. Once you are done drawing, you must scan the shots into the computer. On Photoshop, you must place the pictures in order so and make sure they all line up so the transition in motion looks clean. Another important reminder when animating is to time out your scene to make sure the animation is at the appropriate scene. Once this is done, then you can color over each shot. These steps will help bring your still drawing to life!

We used those steps when animating our project.

Final Thoughts:

I had fun making this film and although it took a long time to finish, I believe my group and I did a good job and our first attempt of the stop motion animation. Hope you enjoy the film!